Wednesday, February 12, 2014

Tote bags


I've always loved tote bags. I think they are very practical and useful. They can be used as a personal bag or as a carry-the-extra-stuff bag. Taking up sewing made me want to make my own. I wanted to make it quilted and colorful, just for myself. Searching all over the internet trying to come across a free tutorial was hard. Most of the patterns I found were for sale. I wasn't willing to pay. I am trying very hard to make this hobby as inexpensive as possible. Eventually, I came across this wonderful lady who is my sewing angel! She has a lot of tutorials on almost everything sewing. I have learned a lot from her. You should check her out here. At the time I was trying to make everything with 60° triangles. I was more worried about the design on the bag then the bags' own design. I made this one for my mom as a Christmas present.


I came to find that this bag was too basic and was missing pockets, a zipper and snaps. I did not know how to add any of these. I went again on a search to find a tutorial, but nothing made sense. I saw somebody post a very neat tote bag on instagram, big and fancy with all the things I mentioned I was missing before. After digging around Instagram I found out it was noodlehead's super tote. I just had to buy the pattern. I love the bag, loved her blog, and loved her entrepreneurial spirit. All of a sudden I wasn't worried about spending money on patterns. I bought two of them! Check her out! You will also like her work.

I really really loved the super tote. Have I mentioned that already? Well I can't stop making them!


Inside out!


Guess what?! I have not made one for myself yet! So far I've made a bag for my mom. I made a super tote for my mother-in-law. I loved it! So, I went on to make one for Seth's grandmother and another one for his great aunt. It is very satisfying and makes sewing much more fun to sew for someone you already have in mind. I put projects for myself on hold because sewing for a loved one fills my heart. Does this happen to you too? 


Tuesday, February 11, 2014

How to change a sewing machine presser foot


Every machine and presser foot is different, but there are some main things to know on how to install a presser foot and how to change a snap on foot. This is how I do it.

Switching a Snap-on presser feet

snap-on presser feet

low shank snap-on presser foot ready to be installed
slide it in between the screw and the presser bar


Tighten the screw, and you are done!
pull on the foot release handle to release the snap-on presserfoot

slide in the new snap-on presser foot
pull on the handle as you snap it in
you are done!

Switching a presser foot by unscrewing

Walking foot

My first time using a walking foot, I could not figure out why it wasn't properly feeding all those layers of fabric through. I realized I did not put this little handle in the right position. I hope this helps you to avoid making the same mistake as me.

walking foot with handle
handle must go over the needle clamp screw
(bar) as shown


press the slant part and tighten the screw


I hope you learned with me today. These are the two kinds of presser feet I own. One where you must change the whole piece and this usually has a handle that must be placed over the needle bar. The other one is just changing the snap on part.


Monday, February 10, 2014

How to make ruffles, gathers & pleats

These are the ways I've learned to do this.


Using a ruffler presser foot

make sure they fit in their positions properly


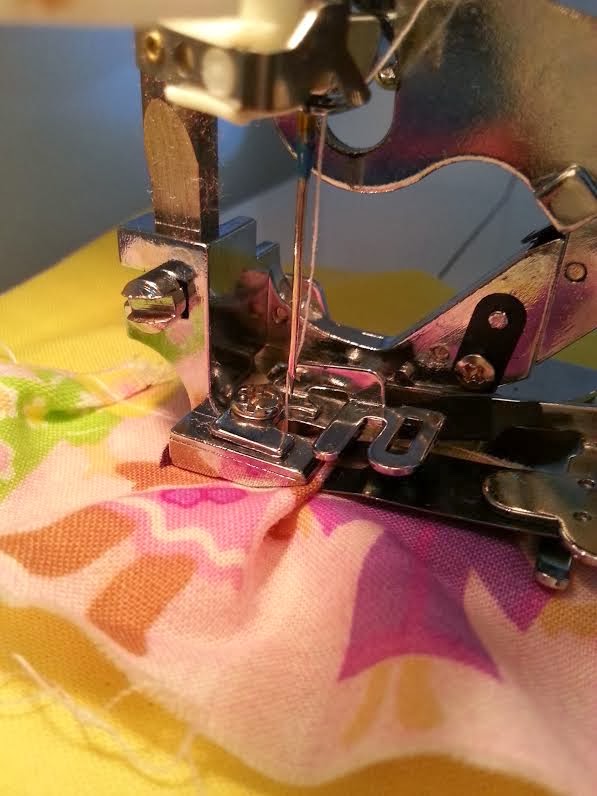
installed ruffler

This sewing machine attachment is not expensive and very easy to use. I bought this generic low shank ruffler at Joann's fabric store for about $10 with a 40% coupon. At the time, I was interested in making a ruffled apron, but couldn't figure out how to make them without this attachment. I enjoyed very much experimenting with it. 


You can see at the top it has a star and three different numbers. These are the three settings this ruffler has.
Set it at the star if you wish to sew in a straight line without having to change the presser foot. The 12, 6, 1 refers to how many ruffles per stitch. So, if positioned at 12 this means every 12 stitches it will create a ruffle, thus making ruffles 12 stitches apart. We have 6 stitches apart and 1 for every stitch. to select simply lift the plate and position the marker on whichever number you'd like.


Slide your piece of fabric following the arrow I drew.  The order should be, over, under, over and straight through. You might need to use tweezers or some pointy object to slide it in all the way through.

Now that you have mastered how to set your project through the ruffler, make sure you have the number of stitches per ruffles set and you may start sewing!

There are two ways you could do this. 
One, start by feeding the piece of fabric you want to sew your ruffles to at the bottom and independent from the ruffler. Then set the fabric that will become the ruflfes like shown on the picture below.


Now you may begin your sewing!

You can see here how the black plate is pushing the fabric in.


Now You can see how the ruffles look with the different setting. 


The above were done sewing the ruffles to the fabric at the same time. Now, let see how to do it separately.


First you sew your one strip of fabric into a ruffle of your desired length.


Then you pin it in place to the other fabric. and sew with 1/4" seam.


You are done! Your finished product should look like this.


So this is how I made my apron. I found this second method more useful for me, as I've mention I am still learning and once you figure a thing out a certain way you can break apart from the habits. It is hard for me to determine how much fabric I will need for each level. So, I sew a strip and then cut it to fit my need.


If you do not have access to a ruffler there are other easy and fun ways to make them.


Make pleats as you go 


I used an 8" square and a 4" by 22 " long piece of scrap for demonstration purposes.


Fold the strap into three sections and press with an iron. I fold it all the way until they overlap at least a 1/4". 


Start sewing and manually feed the ruffles. You can stop the footer presser, lift it, arrange the ruffle, and then stitch over it and repeat. This takes patience, but it is so fun and rewarding!


This is what I ended up with. I like to use a longer strap than needed for the ruffles, this way I am not limited on the amount of fabric I can feed through.


Trim the excess fabric off using either with a rotary cutter or with scissors. 

All done!

Another option is to sew along the sides, forming pleats.


Pulling thread to gather

Sew a line across the length of the fabric you wish to gather together with the longest setting your machine has. I used a 4. 

Leave a long thread and pull the bottom one with one hand and gather the fabric through with the other.


Gather the fabric until you get the ruffles you want or the size you need.


All done!

Friday, February 7, 2014

Me, myself and my sewing machine


On September 7th of 2009 Seth and I went out and got the first sewing machine we came across. We got a SINGER SIMPLE 2263 at Walmart. It was $99 + tax. I love my sewing machine, it began this journey with me and allowed me to explore and learn in the sewing world. Unfortunately, my skills and my needs are advancing faster than this basic one can keep up with. It now seems weak, slow, and it is very hard to use for free motion quilting. Now that I have more experience and have done research, I dream of a Juki TL2000QI. This Juki sewing machine is stronger and faster, with adjustable feeding dogs, which help feed the fabric through smoothly, thus making free motion quilting a breeze. It also sews the stitches even and equal on both sides of the fabric (this is a big deal!). While I save up for a new machine this Singer Simple will have to do. 


SINGER│Simple 2263

Front view


Accessory drawer: Removable drawer in which you can store most used items (brush, screwdriver, etc.)

Bobbin winder: Where you wind the thread onto the bobbin, which then goes into the bobbin case. This feeds the bottom thread. 

Hand wheel: Used to manually move the needle up or down.

Length Knob: Lets you set the length of every individual stitch. 

Light: The light turns on automatically and it aides in better seeing where your stitches are going.

Presser foot: Puts pressure on the fabric to feed it through smoothly. There are many different types.

Reverse stitch: To have the stitches go backwards you must press this button at the same time. Once released it sews forward again.

Spool: It hold the spool of thread. This is your top thread on stitches.

Stitch selector: Different stitches to choose from straight lines, to zig zag and curvy lines. Other machines come with more styles of stitches to choose from. This one only comes with 21.

Width: Lets you set how long the stitch will go from side to side.
Tension dial: Upper stitch tension regulator.


Side view


Pedal: Controls the speed in which you are sewing.

Main plug socket: Attach the electricity cord here.

Power and light switch


Back view


Horizontal spool pin: Holds the spool of thread to provide the upper stitch thread to the stitch.

Presser foot lifter: This is to lift and lower the presser foot. 

Upper thread guide:  The path the thread should follow when winding the bobbin or sewing.


These are the accessories it came with.


From left to right.

Quilting guide bar: Makes it easy to follow previously stitched lines.

Needles: You need lots of these! Especially if you are like me and force fabric through or are a beginner at free motion quilting

All purpose foot: Remember the presser foot? this is one of them. This one allows you to sew in a straight line or in a zig-zag.

Unknown item: I to this day have no idea what this is, and what to call it. I can't even look it up.

L shape screwdriver:  This is the item I always have on hand. It is very useful and much needed when changing those broken needles and maybe into one of the larger presser feet.

Another unknown item: :/

Lint brush: Used to clean bobbin case and needle plate.

Bobbins: Used to feed the bottom thread. It only comes with 4; you will need many, many more for each color you sew in.


So, go get a machine and let's start learning together! Any machine will do for a beginner. If you do not wish to make a large investment on a hobby that you don't know you will stick to, then I recommend buying a used one online or at a flea market. Let your last resort be a big chain super store. If you want to invest in a nicer sewing machine then I recommend going into a sewing machine store, like a sew & vac. There you might find better deals on higher quality machines, new and refurbished.